2 Progressive Overload Training Programs for Muscle & Strength (Gym & Home—Step-by-Step, With Examples, Videos, and Tips)

Training programs don’t build muscle more than a few weeks without progressive overload. As a certified strength and conditioning coach with an MSc in exercise physiology, I can confirm that.
Without progressive overload, your program lacks the oomph to get you in top shape. It’s like flooring the gas pedal in a car stuck in first gear.
To be fair, training programs that employ progressive overload have been around for a very long time—it’s just a matter of working out how to apply these principles to your program to build muscle and strength faster. This is what I’ll show you here.
In the last 10 years, I’ve helped hundreds of clients sculpt a powerful physique. And in every case, I used progressive overload. I fine-tuned the process along the way. And today, I’m going to show you how it works step by step.
I’ll give you two training programs that build muscle and strength:
- A progressive overload template for the gym (4-day split body)
- A progressive overload template for home gyms (3-day full body)
Next, I’ll walk you through each program. But even with a great program that applies progressive overload just the right way, at some point, you may get stuck. So, I’m going to tell you what to do when that happens to bounce back, so you can quickly resume gaining strength and size. Let’s get to it.
Why you don’t need a genius program when starting out
When you start out, you don’t need a genius program to make gains. But as you get in better shape, your program won’t work without progressive overload. It needs to challenge you (if you want to continue to make gains).
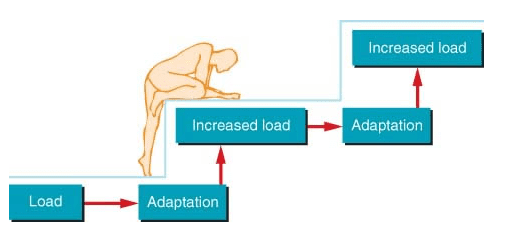
The overload principle states that your must continually place greater than normal amounts of stress on your body to ensure consistent improvements in strength and size. That’s why it’s so important in the long run.
To put it simply, without placing more and more stress on your body, it’s not going to continue growing. That’s the whole reason we go to the gym in the first place; to increase stress on the body’s musculature system. This elicits adaptation and growth.
Here’s how it works:
Figure 1—Progressive Adaptations Caused by Overload
Progressive overload is so important, the team behind this blog even created a smart workout app that automates it for you. It guides you like an expensive coach (just without the expensive fees). You can try it free.
4 ways to implement progressive overload
There are a few different ways that you can add more stress to the musculature of your body. Here are the four most common:
- Increasing the weight
- Increasing the number of reps
- Increasing the number of sets
- Decreasing rest time
Today, I’ll show in-depth you how to overload with two of these (increasing weight and increasing reps).
Overload method 1: Increase your strength & muscle mass
Load is a key driver of muscle hypertrophy. So for this method, we are going to concentrate on getting more weight on the bar for your main lifts. This increases adaptations to your neuromuscular system. You take the muscle you have, and you make it stronger.
This method also increases your volume load, which is another driver of hypertrophy. So, for squats, this might look like:
Week 1 5×5 @ 100kg = 2,500kg
Week 2 5×5 @ 105kg = 2,625kg
The volume increased for progressive overload, but we did it in the strength range for maximal adaptations to our neuromuscular system. This is going to increase our strength, our volume load, and our muscle mass all at once.
Overload method 2: Drive muscle growth with more reps
Volume is also a driving factor for hypertrophy. And the easiest way to increase volume is to add reps.

Therefore, instead of adding weight for your secondary lifts, we will add reps to overload. This may look something like this:
Week 1 3×8 @ 50kg = 1,200kg
Week 2 3×9 @ 50kg = 1,350kg
Notice the difference in volume between the two. When compared to the main lifts, even at a lighter weight, we increased the total volume by more as a percentage (12.5% vs. 5%) and absolute weight (150kg vs 125kg) merely by adding reps. This is going to drive our muscle growth.
2 progressive overload training programs (for gym & home)
Now that you have a basic idea, let’s see how this looks like when used in a program. If you don’t have a program, I’m going to give you two for free (one for home and one for the gym).
The first is a 4-day template using an upper/lower body split. It will require you to have access to a gym with at least your basic equipment.
The second template is a 3-day template using full-body workouts for each training session. It is designed to be able to be done at home with just free weights (no machines).
If you do have a program, you can just implement the progressive overload in the same manner.
Option 1: Progressive overload template for the gym (4-day split body)
Take a minute and look through the programs so that I can run you through them and how you are going to progress.
Upper Body A
- Bench Press 5×5 w/ 2:00 min rest
- Chin-up 4×6 w/ 2:00 min rest
- Barbell Shoulder Press 4×6 w/ 2:00 min rest
- Dumbbell Row 3×8-12 w/ 1:00 rest between each side
- Reverse Fly 3×8-12 (RPE 8) w/ 1:30 rest
- Dumbbell Curl 3×8-12 (RPE 8) w/ 1:00 rest
- Triceps Pushdown 3×8-12 (RPE 8) w/ 1:00 rest
Lower Body A
- Deadlift 5×5 w/ 2:00 min rest
- Dumbbell Split Squat 4×6 w/ 2:00 min rest
- Leg Press 4×6 w/ 2:00 min rest
- Leg Extension 3×8-12 (RPE 8) w/ 1:30 rest
- Leg Curl 3×8-12 (RPE 8) w/ 1:30 rest
- Cable Crunch 3×8-12 (RPE 8) w/ 1:00 rest
Upper Body B
- Above Knee Rack Pull 5×5 w/ 2:00 min rest
- Incline Bench Press 4×6 w/ 2:00 min rest
- Bent-over Row 4x6w/ 2:00 min rest
- Dumbbell Lateral Raise 3×8-12 (RPE 8) w/ 1:30 rest
- Face-pull 3×8-12 (RPE 8) w/ 1:30 rest
- Barbell Curl 3×8-12 (RPE 8) w/ 1:00 rest
- Triceps Extension 3×8-12 (RPE 8) w/ 1:00 rest
Lower Body B
- Squat 5×5 w/ 2:00 min rest
- Sumo Deadlift 4×6 w/ 2:00 min rest
- Hip Thrust 4×6 w/ 2:00 min rest
- Leg Press 3×8-12 (RPE 8) w/ 1:30 rest
- Cable Chop 3×8-12 (RPE 8) w/ 0:45 rest between sides
- Standing Calf Raise 3×8-12 (RPE 8) w/ 1:00 rest
Option 2: Progressive overload template for your home gym (3-day full body)
Full-Body A
- Deadlift 5×5 w/ 2:00 min rest
- Bench Press 5×5 w/ 2:00 min rest
- Chin-up w/ 3×6 2:00 min rest
- Romanian Deadlift 3×6 w/ 2:00 min rest
- Dumbbell Shoulder Press w/ 1:30 rest
- Reverse Fly 3×8-12 w/ 1:30 rest
- Weighted Crunch 3×8-12 w/ 1:30 rest
- Triceps Pushdown 3×8-12 w/ 1:00 rest
- Dumbbell Curl 3×8-12 w/ 1:00 rest
Full-Body B
- Squat w/ 5×5 2:00 min rest
- Incline Press 5×5 w/ 2:00 min rest
- Hip Thrust 3×6 w/ 2:00 min rest
- Dumbbell Row 3×6 w/ 1:00 min rest between each arm
- Dumbbell Lateral Raise 3×8 w/ 1:30 rest
- Chin-up (underhand, narrow-grip) 3×8 w/ 1:30 rest
- Weighted Twisting Crunch 3×8-12 w/ 1:30 rest
- Lying Barbell Triceps Extension (Skullcrusher) 3×8 w/ 1:00 rest
- Barbell Curl 3×8-12 w/ 1:00 rest
Full-Body C
- Front Squat 5×5 w/ 2:00 min rest
- Decline Press 5×5 w/ 2:00 min rest
- Reverse Grip Bent-Over Row 3×6 w/ 2:00 min rest
- Dumbbell Split Squat 3×6 w/ 1:00 rest between legs
- Dumbbell Front Raise 3×8-12 w/ 1:30 rest
- Dumbbell Side Bend 3×8-12 w/ 1:30 rest
- Chin-up 3×8-12 w/ 1:30 rest
- Face Pull 3×8-12 w/ 1:00 rest
- Rope Upright Row 3×8-12 w/ 1:00 rest
If you use this blog’s smart workout app, you’ll have noticed both of these programs are already available in it. They’re also fully automated.
How to progressively overload your program to build strength & size
Number lifts and letter lifts
The first thing you’ll notice is that the first few lifts of each day have numbers, and then the rest have letters. This is to help keep your lifts organized and to help with progressing. You aren’t going to be able to increase the weight on every single lift, every single day. Nor do you need to.
Take Upper Body A from the 4-day split for example. When you increase the weight on bench press, you are overloading the pectorals (chest), delts (shoulders), and triceps. However, let’s say you get to the triceps extension, and you can only do the same amount as the week before. That’s fine since you already overloaded the triceps during bench press!
The numbered lifts are going to be your main lifts. These are the big compound lifts and you will work in the strength range of 5-6 reps. These will be the movements that I want you to concentrate on.
For progressive overload, we will be adding weight to these lifts. Building strength with these movements is your main objective as they will lay the foundation to your training. Still, there will be enough volume there to get some muscle growth.
The letter lifts will be your accessory and isolation movements. With these, you will be using a system called RPE, or rate of perceived exertion. RPE works on a scale of 1-10, which ranks how hard a lift is by ranking your exerted effort. 1 means it’s very easy, and you could do it all day and 10 means you are maxed out.
You will be using a weight that is done with an RPE of 8 in the 8-12 rep range. As mentioned above, 8-12 reps is in the hypertrophy range with the primary goal of adding muscle size.
These movements may fluctuate some as you will be fatigued from the previous lifting. However, I want you to focus on being able to do more reps, rather than adding weight. What this means is that instead of adding weight to a movement, you will do more reps.
Take the triceps extensions again. If you do 50lbs 3×8 the first week, the next week you’ll try to hit 50 lbs 3×9, etc.
Try Dr. Muscle for free to build muscle with progressive overload
Week 1/Protocol Week

Your first week will be spent on familiarizing yourself with the movements and finding a decent starting weight.
This is very important. When we are looking for a good starting weight, we are not trying to max out. Instead, I would rather you start with a weight that is too light than too heavy. My clients have much better progress when starting with a light weight.
The guys who start heavier will use heavier weight at first. However, almost every time, these guys burn out fast, and the guys starting with smaller weight eventually pass them.
It’s your classic tortoise vs. the hare.
For your number lifts
For your main lifts, you are going to gradually add weight to the bar in consecutive sets and work up slowly using the same rep range. You will do this until you hit an RPE of 8, which was explained above. Then, just to be sure, you’ll take off 10%, and that will be your starting weight the next week. What this may look like using bench press:
- Warm-up set: Bar x 10
- 60kg: 1×5
- 80kg: 1×5
- 90kg 1×5
- 95kg: 1×5
- 100kg: 1×5 This feels like a good weight. Challenging, but you are confident you could knock out 2-3 more reps.
You then take 10% off which brings you down to 90 kg. Next week, you will do 90kg 5×5
For your letter lifts
Your letter lifts will use a similar method, except you will work up to 8-12 rep range. Also, you won’t drop in weight. Whatever happens, this week will be what you start with next week. Don’t worry too much about finding the perfect weight here. You are going to grow into it. Your main focus here is to allow yourself to become familiar with the movements and give you a good idea for a starting weight.
Progressive Overload: How To Find Starting Weights (Main Lifts)
Progressive Overload: How To Find Starting Weights (Accessory Lifts)
Week 2/First Real Week
Week 2 should be easy as you will just work through with the weights you have from the first protocol week. As this is your first week, you should hit all your weights with relatively no problem. If, for some reason you can’t, it means you overestimated your weight, and you need to lower the weight accordingly for the next week.
Week 3-8/Applying Progressive Overload
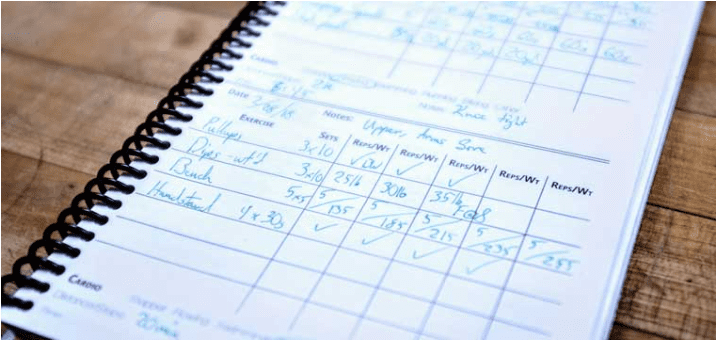
Now is when we will start using progressive overload and start improving. KEEP A RECORD!
Number Lifts
Above I mentioned that the number lifts are going to use weight to implement progressive overload.
A general rule says lifters should add 5% to their upper-body lifts every week and 10% to their lower-body movements lifts every week. Most people don’t have access to very small, incremental weights to make exact 5-10% jumps. Even still, I think this can be too high.
Therefore, for upper body movements, add no more than 5 lbs a week. For lower body movements, make no more than 10 lbs jumps.
I still like my clients to add smaller amounts if they are able to. Your goal is long-term development. If you only add 2.5 lbs to your bench press and 5 lbs to your deadlift every week, after just 1 year (52 weeks), your 5rm for bench will have increased 130lbs, and your deadlift will have increased 260lbs.
You can see how adding just a little weight can add up fast. This is why I really push starting light in addition to making small jumps. It’s not going to take long to be moving heavy weight.
Build slowly. It will pay off in the long run.
Table 1—Example of Progressive Overload Applied to Bench Press and Squat
| Bench Press | Squat | |
|---|---|---|
| Week 1 | 5×5 150lbs | 5×5 200lbs |
| Week 2 | 5×5 155lbs | 5×5 210lbs |
| Week 3 | 5×5 160lbs | 5×5 220lbs |
Letter Lifts
For your letter lifts, you will attempt to increase the reps you perform.
One reason for this is that we are trying to increase the volume, which is much easier done by doing more reps. The second reason is that it is much harder to add weight when doing high reps unless you have access to very small weights.
Once you can do 12 reps with a weight using good form, it’s time to jump.
Bicep Curls
Week 1 3×10 @ 40lbs
Week 2 3×11 @ 40lbs
Week 3. 3×12 @ 40lbs
Week 4 3×8 @ 42.5 lbs
Tips on Running A Progressive Overload Training Program
5 common problems (and pro tips to continue overloading your program)
Weight jumps are too big
One problem is that for some people, weight jumps are too large. Or, after you have been on the program for an extended time, you are unable to hit every set with the new weight jump. There are a couple of things you can do.
A. The first is to increase the weight for 1 set at a time. Take bench press for example. Let’s say one week you did 150lb 5×5. The next week you can do 155lb 1×5 and then drop the weight and do 150lb. 4×5. You still implemented progressive overload in that first set. Then the next week you can do 155lb 2×5 and 150lb 3×5….you get the idea.
B. The second is to increase the reps by 1-2. Instead of doing 5×5, do 5×6. Or, do 4×5 and then as many reps as you can on the 5th set. That may look like 4×5, 1×7.
The key is adding progressive overload in some manner.
Can only jump on some lifts
This is especially common for lifts that use the same muscle groups, such as bench press and shoulder press. Take Upper Body A’s workout. You may be able to increase on the bench press, but not the shoulder press.
If this happens for 3 or 4 workouts, you can switch the movements and start with shoulder press. Anytime a movement is lagging, you can switch it and let it be the first movement of the day.
Look at each lift individually
This is in conjunction with the above but work on each lift separately. You may notice that some of your lifts improve easier and smoother than others.
DO NOT increase the weight for all lifts just because you improve on one. Just because movements are related i.e. squats and deadlifts, their movement patterns are very different. Progression on one does not mean you jump the weight on the other.
Therefore, don’t get flustered if everything doesn’t improve together in unison. That would actually be odd.
Overall progression is stalling
One of the problems with progressive overload is that you may reach a point where you start to plateau (your progression is becoming stagnant). Stalling shouldn’t happen in your first 8 weeks of training.
But if it happens, one of the best things to do is take a deload week. This is simply a week where you do the same program, except you drop the weight substantially. Drop the weight for all movements by around 35%.
You’re feeling worn out
This usually happens when you’re doing too much too soon. Progressive overload is a great way to build muscle and strength. However, it’s important that you don’t overtrain by pushing too hard too fast.
Remember that muscle growth takes time. It’s best to progress gradually rather than to go too fast and burn out. You need to take rest days. In fact, your muscles recover and rebuild when you rest—not when you train!
How to continue making progress after your program
You have a few options to choose from when you finish running this program:
1) Keep Going
If after 8 weeks you are still making progress, keep going. One thing you will learn is that if something is working, don’t stop. I have clients who do some things that I don’t necessarily agree with but it works for them. I’m not going to stop them. I also won’t tell you to change the program if you’re still making progress
2) Use Periodization
One of the simplest things you can do is run through the program again, but simply use a different rep scheme for the main lifts. You’re going to do the same program, but instead, you will work in a different rep range.
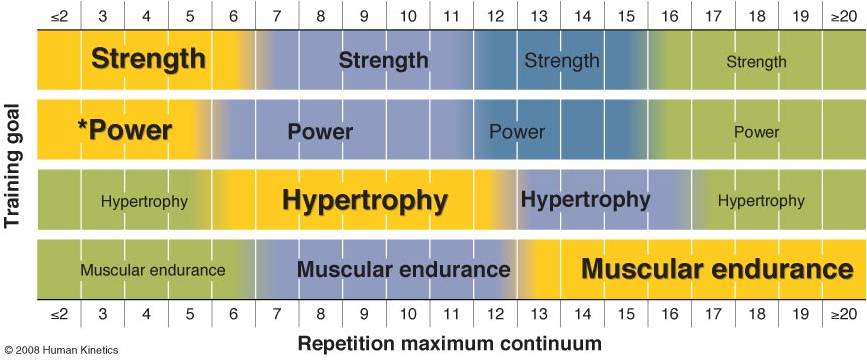
This is called periodization and is simply a method that alters your lifts’ intensity and volume to create a different stimulus. This means that you can either lower the weight and increase the reps to the hypertrophy zone or increase the weight to the 3 rep range and work in the power zone for your main lifts. Alternatively, you could do a strength cycle for hypertrophy.
If you drop the weight and use a power scheme, your total volume will drop. However, as it is a new stimulus, it will still drive progression as you will now work on progressive overload in the power range.
Power, strength, and hypertrophy all work together and if you increase one of these variables, it will have a positive effect on the others.
Figure 2—The Repetition Continuum for Resistance Training
3) Swap Out Your Main Lifts
This tends to be a favorite of lifters as it adds more variety. Also, being that a lift is new, you will most likely be able to progress quite easily again. When swapping out lifts, you are looking for slight alterations using the same movement patterns. Below are some examples:
Bench Press —> Dumbbell Press, Floor Press
Deadlift—> Sumo Deadlift or Deficit Deadlift
Squat—> Front Squat, SSB Squat
Lat Pulldown—> Pull Ups, Neutral grip pull ups
Barbell Row —> Seated Row, Seated Row Neutral Grip
You get the idea. With this, all you do is simply swap out the movements and run the same program.
4) Combination of 2 and 3
The title says it all. In reality, this template can last years by swapping around movements and changing rep range.
And that’s about it. With either the 3-day or 4-day template, you see how many options you have available to you.
Tips & Tricks for Optimal Progressive Overload
The 1 progressive overload training trick that will never let you down
Progressively increasing your training load is one of the most effective ways to build muscle and strength. Especially in the long run.
But when you start your lifting career, you don’t need to overcomplicate progressive overload. Your first year of lifting should be simple, requiring minimal “tricks”. To be fair, progressive overload really is the one trick that will never let you down.
Rotate movements, change your rep scheme, even take a deload week when you need. As long as you are using progressive overload in some manner and adding a new stimulus to your body, you will improve. This is the aim of every single program.
If you need additional help with your training, we offer a smart workout app specifically designed to guide you as you train with progressive overload. It takes all of the guessing out of your workouts. It tells you you exactly what to do. It truly puts your progress on autopilot. And it automates progressive overload from A to Z for you.
And you don’t have to keep up with the latest training science and best practices—we do that for you. We update the app almost every week and fine-tune your program automatically as the art and science of lifting progresses.
On the fence? You can try it free or see our reviews. Here are a few:
Want to build muscle and strength faster with progressive overload—and do it on autopilot? Try Dr. Muscle for free.
Try Dr. Muscle for free to build muscle with progressive overload